I'm back! Sorry for the long hiatus but we are now all settled in after moving literally from one end of the world to the other.
Wednesday 31 August 2011

Tuesday 30 August 2011
Tools for the Blogger
Hey hey! Thanks for the kind words and support about our latest fiasco. ;) The adjuster came out today and he was SO awesome – we’re hoping for good news. It could be up to two weeks before we can do anything though, and I’m already itching to have a working kitchen again.
It may be a long two weeks! :)
Anyhoo, I joke that I’m shocked I even have a functioning blog, let alone one that does alright for itself, cause I’m CLUELESS when it comes to computers, web stuff, html, all of it. Terms like “SEO” make me go HUH? I just don’t get it – I think I would if I took the time to learn it all, but I’m too busy DIYing and then blogging to learn all that.
Someday I will. For now, I continue to hang on by my fingernails. ;) But there are a few sites that I use constantly that are extremely helpful to me when it comes to blogging. And most of them could be helpful to anyone – blogger or reader!
The first one that I think is most important is keeping track of your statistics. Even if you don’t have advertisers or care what your numbers are, it’s a good idea to have some kind of tracker installed on your site. You just never know when you’ll want to check out your stats. It’s also fun to look back and see how you’ve grown from time to time. :)
I’ve told you before I don’t look at mine often. I’ll check maybe once a month just to update my numbers for advertising purposes. If I look much more than that, I get all weird and freaky and wonder if I should do more and feel like I can’t keep up and I hate that feeling. :)
I use two sites – the first is StatCounter:

It’s super easy to install on your blog (in blogger I think I installed it as a html button) and it keeps track of all sorts of things:

The thing with StatCounter is that their numbers are wayyy low compared to other programs I’ve used. Blogger now has stats readily available, and StatCounter’s numbers don’t even touch what Blogger tells me.
And the Google Analytics numbers are between those two:

Their numbers are still way higher than StatCounter’s, but not as high as the Blogger stats. It’s highly confusing. I still haven’t heard a good explanation as to why this happens, but I think it’s common for most bloggers.
I typically use Analytics – especially for things like page views and to see where referring traffic is coming from. I post my top ten blog referrers for each month (down on the bottom left side of my blog) and I get that info from Analytics:

I put the code for Analytics on my blog myself the first time I did it, and then when I got a redesign I had to have the designer do it – I could not for the life of me figure out how I did it! It can be tricky, so ask around if you need help.
I told you – clueless! :)
I’ve mentioned my love for Picnik before:

Most of the photos you see on this blog are touched by The Nik somehow. And you can do SUCH fun stuff with their effects:


I highly recommend playing around with it for a while. You’ll love it! (And most of their options are free!)
When it comes to the moola, I only accept payment from individual advertisers through PayPal:

There is a small fee that comes out of each deposit, but it’s worth it to me. It’s so easy to use for invoicing, and they keep track of all of my transactions for tax purposes as well. (You can get a monthly statement or end of the year.)
And the great thing is, most small businesses use it anyway – so most everyone has an account. I tried accepting checks for a while and it was just a mess. This works out much better.
Of course there’s the social media STUFF. Twitter and Facebook namely. And many of you know the great Pinterest for the awesome online archiving system that it is:

I showed you more about this amazing site here. And yes, I know. It’s annoying when everyone under the sun is talking about some site you know nothing about. Believe me, I avoided it for a while just because I felt like “everyone was doing it.”
I can be a brat like that. ;)
But it really is an awesome tool. For reals. If you love blogs, you will love it. And if you are a blogger – USE IT. Pinning will get your blog out there because you know a good “pin” will travel endlessly through time. ;) If you have a blog, I highly, highly suggest you create your account with your blog name. I can’t find half the blogs I follow because they’re all under personal names and that bums me out! I want to see what they are pinning! REAL bad. (Go to “edit profile” under your photo to change your name if you want to do so.)

And I absolutely pin my own projects – if I post on something DIY or decor-related, Pinterest is one of the three places I link the post to right after I hit publish – along with Twitter and Facebook.
Yes, it felt odd doing it the first few times, and I don’t do it a ton (Pinterest specifies that they don’t want the site used purely as a tool for self-promotion), but I see it as another marketing tool and find it’s brings a TON of traffic to my site. It now beats out Twitter and for sending traffic to TDC.
Please don’t be afraid to promote yourself! Just be cool and don’t get all freaky about it. ;)
Speaking of linking to Twitter – I use bit.ly to shorten my links: 
You only get so much space for tweets, so this helps a ton – it knocks the link to my posts down to 10 or 12 characters.
I’ve used similar sites in the past and had one link to a very spammy site instead of mine once, so since then this bitly site is the only one I use. Yikes. No one wants to see that. Seriously.
One great little tricky trick that I learned a couple years ago was to use Google Alerts:

Google Alerts are email updates based on a topic you enter – so say you want to know every time your blog name is mentioned out in Googleland. You enter it as one of your alerts and it sends a daily email with links to each site that mentions you.
It’s just a cool little tool – and you can use it for any term you want. You could enter “painting” or “molding” and everything will come up daily for those terms. The sky is the limit! It’s a great way to see who is talking about your blog, but it’s also an easy way to find out more about any topic you are interested in.
Finally, the boring stuff – but it’s the stuff that keeps your blog and all of your tools safe and sound! Did you know you can download the content of your blog whenever you want? If you are in Blogger, go to “settings” then under “basic” click on “export blog” under blog tools.

Remember – hit export, NOT delete. ;) When you hit download blog, it will save the content. So JUST IN CASE…you’ll have a back up. I try to do it once a month but should do it more often. And I’m not even sure what “Atom export format” is – but I know it’s saving something. I hope.
(If you didn’t believe me the first few times – clueless.)
And I also use Carbonite for my computer:

I only use it cause Dave Ramsey told me too. ;) I’ve had it installed for a couple months and so far so good. It is GREAT peace of mind – I know all of my files (especially my photos!) are safe and sound. I used to use Photobucket for everything, but it just became too time consuming to download every photo.
And if you enter “Ramsey” when you check out, you get two months free or something like that. ;) (I think it’s Ramsey!) Whoo!
So there you go – a few of my tips for the blogger that even non-bloggers can use. I aim to please all peeps! I hope this helps some of you! Are there any I’ve missed? Any great tools on the Net that you use and love? Share with the group!
Monday 29 August 2011
Our Visitor, Murphy
Some mornings I wake up and have NO clue what I’m going to blog about that night. I rarely schedule posts ahead – I’m a fly by the seat of my pants kind of blogger.
This morning I was thinking of the projects I could complete to blog about, and was trying to figure out what I’d have the time to finish up.
Well…I got some blog material. Just not the kind I wanted. ;)
If you follow me on Twitter you’ve heard some of the goings on around here over the past few days. It started Saturday morning when we woke up to a puddle of water in front of the refrigerator.
Turns out the computer on the fridge had died, so everything inside (including a huge ice bucket) had melted, and then spilled out onto our floor. AWESOME, letmetellyou.
Long story short, the repair guy couldn’t fix the fridge with the parts he had, but he did fix the one in the garage that had been broken for months (we got it free from friends, so it was worth fixing, considering we had NOTHING otherwise).
Because we’ve had so many issues with our kitchen refrigerator (GE Profile) we decided to purchase a new one. I was annoyed and upset, but after a while was a little excited to get a new fridge, I’m not gonna lie. :)
But then we noticed the floors…the laminate was bubbling and buckling and all those bad “B” words you don’t want to use to describe flooring. ;)
Our insurance company sent someone out today to see how bad it was, and within a few hours of him arriving, this:

Had turned into this:
 (Different angle, bear with me.)
Needless to say…it was bad. :)
We have no idea how long the water sat on the floors – we figure at least six hours. Because our laminate is “floating” – not glued or nailed down, the water traveled under the floors throughout half of the kitchen.
It also reached the basement, but luckily we got to it before it got too bad. They had to cut a huge section of the floors out – the laminate, underlayment, original vinyl floors and plywood under that all had to be pulled out.
So for the next few days, we have four blowers and an industrial dehumidifier in our kitchen, and three blowers and a dehumidifier in the basement:

I was doing OK with everything, considering, until they had to move the kitchen island.
My lovely beadboard island had to be taken apart so they could move it. It’s now sitting in the office:

And I was actually making progress on that office. ;) I had hoped to finish painting it today.
HAR. That so didn’t happen. :)
Because they had to remove the island, they took the trash compactor out too – it’s now in the garage. So this is our trash can for the next week, two weeks…month?:

We have no idea what the timeline will be. Because our flooring goes throughout the kitchen and family room, it’s ALL going to have to be pulled up and replaced.
For now, we will be living upstairs for the next few days. You can’t hear much over the blowers. :)
Our trash can is a chair and our refrigerator is in the garage (opposite side of the house from the kitchen, of course). Good thing I’m not a cook!!
That’s a joke Dad. ;) (Kind of.)
I’m not good at having our house turned upside down – messes and toys I’m OK with. But this…this is going to give me hives and I’m well aware of that. I’m trying to fight them off by at least cleaning up the kitchen. It’s been a disaster all day, so I tried cleaning tonight:

It’s just a MESS. And the blowers send all the dust back onto the surfaces all over again, so I’m not sure why I’m even trying…but I’ll keep doing so. I must. :)
Tomorrow the insurance adjuster comes out to check it all out and we’re hoping for good news. We’ve never had to file any claims on our house, so we’re kind of learning as we go.
This has been an eventful summer around here – first the back door disaster, then we had some siding fall off in a storm, then we realized a couple weeks ago that our back door frame is rotting away (like, crumbling) and needs to be replaced and now we need a new fridge, new flooring and let’s not forget a whole fridge full of food. (Of course I had gone grocery shopping just two days before.)
We’re rolling with it though, and I’m reminded again how thankful I am that we are all safe, happy and healthy. That’s all that matters to me, and I am certainly counting my blessings tonight, even while the hives form. ;)
Soooo…Murphy has been hanging out around here fo sho and we need to kick him to the curb. He’s been sleeping on the couch waaaay too long. Gots to pack his bags and GO. He doesn’t have to go home but he can’t stay here. ;)
Any recommendations on flooring? We’re looking into engineered wood this time. Seems to be a good in between option – better than laminate but not as expensive as hardwoods. Because our kitchen and family room is one big space, we won’t break it up with two different types of flooring (like tile and hardwoods). If the kitchen was a separate room I would use tile for sure.
The guy overseeing all of the clean up said they have special mats that soak up any water damage from engineered flooring now, if it’s caught early. (Crossing my fingers and toes we’ll never have to find out how that works!!) Any thoughts? Anyone have them and like them?
That was my exciting weekend…how was yours? ;)
Friday 26 August 2011
Giveaway Weekend!
Hey hey Squeezays! How the heck are ya? It’s the last weekend in August – which means you-know-what (the most wonderful time of the year) is approaching quickly! (WHOO!)
I mentioned a couple of weeks ago that my Sis (affectionately known on this blog as Stink Eye – go here to find out why) is getting married!! Which means I get to pin all kinds of fun wedding stuff on Pinterest now. She doesn’t even have a date set, but I may or may not be planning the whole event already (for her, of course). ;)
So this weekend’s giveaway is perfect! Two Broads Design specializes in personalized wedding decor, but their items aren’t just for weddings!

I loved all of their handmade goodness and wanted to share a few favorites with you! Like these cutie wooden tags:

They are stamped with a waterproof image and are great for wedding favors, but could also be a beautiful napkin ring or gift tag. I think they’d be adorable hanging from gift bags for every day kind of surprises just to let someone know you’re thinking about them. I’m going to get the Heartfelt Thanks tags just to have on hand.
And you know the fall-inspired tags got my eyes a-fluttering:


How sweet for the Thanksgiving table -- the twine is the perfect rustic touch!
Hold on to your seats peeps – this next one is AWESOME:

Aren’t they BEAUTIFUL?? Oh my goodness, I think my jaw dropped when I saw them the first time. :)
These aren’t just spray painted – they are hand painted with durable oven fired specialty paint designed specifically for glass. They are even dishwasher safe!
Oh my – the possibilities are endless. Fun for a wedding, of course. But the orange ones would be beautiful with sand and candles, lined up along the sidewalk for trick-or-treaters. Or any color with candles for the deck, or hung with ribbon from trees in the backyard…sigh. :)
I think they are just dreamy.
The rustic favor bags are perfect for any event – a shower, wedding, whatever:

Or get a bunch just to have for last minute gifts – they are SO much cuter than the basic bags from the store! You can choose from seven different graphics, and then add whatever wording you’d like.
I love that you can get a ton of their items (for an event), or just a few for personal use. And the prices are fantastic – the bags are sooo inexpensive, and the tags end up at less than a dollar each.
These rustic barn wood chalkboards look like they’re straight out of the Pottery Barn catalog:
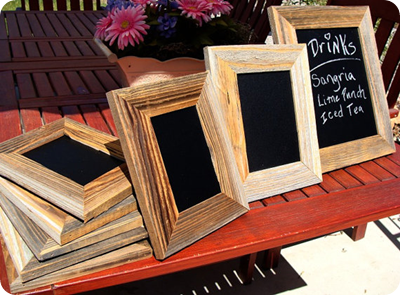
They’d be fun little teacher gifts, or a pretty way to label the food at your next party. OH! Or hung in a grouping on a wall, maybe in a kitchen? I LOVE them!
They also carry larger chalkboards as well:

The boards are made with a restaurant grade chalkboard vinyl and can be customized to pretty much any color:

And each board comes with an eraser and chalk! They think of everything! :)
The folks at Two Broads Design are graciously giving away TWO $40 gift cards to use as you wish at their shop! Yahoo! I know you’ll be able to find something fun!
If you order from their site between now and next Friday, September 2, you can use the coupon code "THRIFTY15" for 15 percent off anything in the shop!
Here’s how to enter to win a $40 gift card:
1. Leave a comment here. Are you as excited for fall as I am? :)
2. Visit Two Broads Design here. Browse around and find something you love. Come back here and let us know what it is in another comment.
3. Like them on Facebook here. Come back and leave another comment letting us know you did.
Remember if you comment anonymously or you have a private blog, please include your email address in each entry, and spell it out with “at” and “dot” to avoid any spammy emails coming your way.
This giveaway is only open to US residents only. It will be open till this Monday, August 29 at noon EST.
I hope you have a wonderful weekend! To all you East coasters, please be careful this weekend and we’re praying everyone stays safe!
Wednesday 24 August 2011
My Clutter Nemesis
Well, the hubby started back to school last week. And the Bub starts again next week. This year it’s Pre-K and he will be gone more than ever.
I don’t know if I should cry or do a happy dance. I’m so confused.
Next year he goes to all day kindergarten and I’m quite sure they will have to pry him from my white knuckles. ;) I am already dreading it.
But it’s back to school time! I’m supposed to be happy, right?
Yay.
:)
Anyhoo, every change of seasons brings up some major organizing mojo in me. After Christmas I’m ready for a clean slate, in the spring I’m cleaning like mad (OK, not really, but I feel like I should), summer I’m a slug, and then in the fall, I’m determined to get our lives back in order before the holiday madness hits.
Back to school always bring this up too. This year I’m determined to conquer one of my biggest and baddest clutter spots. I’ve told you about the piles. And the laundry room. I’ve hinted at the disaster that is the master closet.
But this one is waaaay up there at the top. I mean bottom. Wherever the biggest catastrophes go. ;)
It’s the car. I just can’t keep it under control. It’s like, physically impossible. For real. But this year, I want to at least try. Trying is something right?
There’s one thing I notice each morning when I drop off the Bub at school. It’s that every Mom seems to be a size two.
Wait, that’s not it. (But seriously, how??)
It’s that my car seems to be the worst of them – not one is as messy as mine. It makes no sense. Actually, it does, cause they go to the gym after drop off and I go to Goodwill. And then fill my car with crap. But whatever. Details schmetails.
Well, I’m done – I’m going to make a REAL effort this year. For at least a week. ;)
I started yesterday by pulling the car out of the garage so I’d have plenty of space. I then pulled EVERYTHING out and dumped it behind the car:

Yes, all of that was in my car. No, it’s not a big car. And this does not include the trash -- I spared you that. You’re welcome. :)
I had a meeting last night so I dumped everything behind the car on purpose – I had to get it all put away before I left, or I wasn’t going anywhere. Brillz, yes?
Let’s see what was in my car, shall we?:

Randomness. My specialty.
I took out every last bit of bits. Emptied consoles and drawers and nooks.
About half I put away. The other half is in the garage (my next project) and the laundry room. Moving piles around is my other specialty. ;) But it’s OUT of my car!
I took the car seat cover off and washed it, then hosed down the seat.
Yes, hosed. This might clue you in to why there are no before pictures.
The only things I put back in were the car seat and the car manual:

And a state map. Cause I’ll need that. You never know.
Back in high school and college, when things weren’t so good financially, I would scrounge up change and take the car (mom’s or later mine) to the car wash. Cleaning it out and and using their awesomesauce vacuums would always completely change my mindset. I felt so in control of life when my car was clean.
So now, even though we have a shop vac at home, I always go to the car wash to vacuum out the car:

It’s just one of those weird things, you know?
I talk about how amazing it is to rid your home of the stuff you don’t use or need or appreciate. It will make you feel control over your home and your life – there’s something really powerful about it.
It’s the same for the car, in my opinion. Some of us spend a LOT of time in the car – and when it’s clutter-free, it’s a much more peaceful place.
I need to take my own advice more often. ;)

The only things left in the back are items I need to return and our outdoor blanket I always keep in there, just in case.
I’m determined to keep the car spotless for a week. If I can do it a week, I can do it two. If two, well, I’m going for a MONTH. Shooting for the stars people!! WHOO!
So far so good. It’s only been a day. You have no idea what a big deal that is. ;)
I’m on a mission – if I can’t be a size two, I can at least have the cleanest car in the school parking lot! Yesssss…
Do you keep your car clean, or is a problem area for you too? Have you tried and tried to keep it clean like me? Any success stories? I’d love to hear!
Monday 22 August 2011
DIY Potting Bench with Dad
Well hello there! Thanks so much for your excitement over our patio project. ;) Today they finished installing and mortaring the fireplace. (It was dry fitted before.)Tomorrow they start applying the stone. YIPPEE!! I think the landscaping may start as early as Thursday or Friday.
SO. EXCITED.
Because we are on an outdoor roll lately, I got some mojo up in here and tackled a project I’ve wanted to do for years.
I’ve always wanted a potting bench…you know, for all the plants I can’t keep alive. ;) I wanted it for planting, but also for entertaining. A separate spot to put ice, drinks, food, whatever, sounds awesome.
So the potting bench was the perfect answer. And my Dad said he’d help me build one. GLEE!!
He came over and I showed him my inspiration photo from Pinterest:

That would be the Abbott Island from Pottery Barn (of course) and it is pretty awesome, yes? The price is pretty awesome too – as in I’m pretty awesomely going to pass out, $1000.
Dad’s response? “We can totally do that.”
OK, I added the totally…he didn’t say that part. But he knew we could do it!
We took a trip to my fave True Value (Pendleton, IN) and looked through the HUGE lumber yard:

(That’s only half of it.)
We talked about what type of wood I wanted to use. Initially I wanted cedar (because it would hold up best outside) but it is a bit more expensive. Then Dad asked if I’m good about putting outdoor stuff away or covering it for the winter and my response it was a quick and definite NO.
So we went with cedar. :)

We got our supplies – 4 x 4’s, a few 1 x 4’s and a bunch of 1 x 6’s. (If you have no idea what I’m talking about, I’ll show you those in a video below.)
We cut the 4 x 4’s to 36 inches, then stood them up to start our design:

We cut the 1 x 4’s to the length we needed (more on that in a bit), then attached them with screws to the top of each 4 x 4 and about a foot from the bottom of each as well (for the bottom shelf I wanted):

You can see here how the 1 x 4’s (the long horizontal boards) go off the edge of the legs a bit:

That’s because we created a “frame” around the whole thing, on top and bottom:

No mitered (angled) cuts – just simple, straight ones. The best kind. ;)
For added support, we put a couple more boards on the inside of each leg as well:


See in that upper right picture, how basic this is? It’s just boards screwed into boards. If you have tools, YOU can do this. I mean it!! Yes, I am yelling at you!!
We added a couple more boards to the middle, again with screws – just for a bit more support:

More support never hurts. ;)
Then we cut 1 x 6’s to the depth of the table (about 25 inches) and laid them across the bottom. Yet again, we just screwed them in. No glue, no nails. Just screws.
Easy peasy. I swear.
We cut more 1 x 6’s to fit the top, this way going with the length of the table. Our cuts were a bit off and we were getting a little tired and a lot hot, so we just installed them, then Dad cut down the edge with the jigsaw:


It worked like charm!
And then…we were done. Start to finish, it took us two hours. TWO HOURS. Yes, I am yelling at you! ;) I can’t believe how fast it went!
We were both in a groove, because this whole thing went like buttah. Not one issue -- we couldn’t believe it.
I found some basic, low profile hooks at True Value as well and attached those to the sides:

I have no idea what I’ll hang on them but they look FAB!
I love it so much!! (Yelling!):

I did a quick video to show you the details up close, just in case this isn’t clear. It really is a basic as it looks though – it came together easily.
Here’s the video and I cannot believe I put my face on here, seriously. I had been sweating profusely for two hours straight. And I say “um,” “basic,” and “just” an awful lot. I’m no TV star people:
You can see on the video that the bench is placed over our fireplace vent right now but the fireplace is not on and the pilot light is not lit. It will be moved over. Do not put anything near your vent!
So here’s the PB version:

And ours:

The PB version is 50” wide, 28” deep and 36” high. Mine is 60” wide, 28” deep and 37” high. I didn’t even plan on the dimensions matching up so much, it just worked out that way. :)
The cedar wood cost about $130 – not a cheap project, but considering it’s $870 cheaper than my inspiration, I’m thrilled. And mine is even wider than theirs!
I’m trying to decide if I’m going to add some wheels – I found these super cool casters at True Value:

I just don’t know if they’re chunky enough. I may put them on just to see – it won’t hurt!
Now…the BIG question! What to do now? I had planned all along to stain or paint it. When I mentioned that to my Dad I think he may have had a small conniption. ;) He said the cedar will age beautifully over time and he would just leave it.
And when I hosed everything off, it was even more gorgeous – the water brought out all the beauty in the wood:

So now I’m leaning toward just a coat of poly or Tung oil, to bring out the tones of the wood.
What would you do? Paint it? Stain it? Leave it as is? I know what my Dad would do. ;) Once I figure that out, I’m going to start using it and I cannot wait!
Speaking of my Dad – HE IS AWESOME!! It thrills me to no end that we can DIY together like this. I love that we continue to make father/daughter memories, even as I get older. And he reads this blog, every day. :) Thanks Dad, I love you!
I was one of the bloggers selected by True Value to work on the DIY Squad. I have been compensated for my time commitment to the program as well as my writing about my experience. I have also been compensated for the materials needed for my DIY project. However, my opinions are entirely my own and I have not been paid to publish positive comments.
Subscribe to:
Posts (Atom)