Sunday 31 October 2010

Share your Holiday Home

ACK! I am so excited! It’s time to start thinking CHRISTMAS!!!

Yahoo!!

YES, I know…Thanksgiving comes first. I love Thanksgiving as much as the next person…but November 1st really signals the start of the holidays for me. So I get to dream, swoon and plan for them starting today. :)

I am THRILLED to share a fun event some of my beautiful bloggy friends and I have thrown together – I guess you could call it the “progressive dinner” of blogland?:

Holiday_Home_Banner_2

YIPPEE!!!

It’s a series of linky parties, all holiday-based, all FUN. :) We’ll kick it off with Layla from The Lettered Cottage on Tuesday the 30th for a mantel party. Then Rhoda from Southern Hospitality will host the vignette party on the 2nd. Kate from Centsational Girl will follow with a crafty shindig December 7th. And I’ll finish up with my annual Christmas Tree Party on the 9th.

I know. I know. FUN!! I’m busting at the thought of it. :)

So start thinking about what you may want to link up! You’ve got plenty of time to get ready. :)

Have a great Monday! I’ll be back late tonight with the November Before and After Party.

Saturday 30 October 2010

Autumn in Indiana

Hello there! Hope your Halloween weekend is going beautifully!

A couple of weeks ago, my Sis and I took a day off from the decluttering around here to take in some of the fall beauty around us. It was her last day before heading to her new job and my last day having her around all day. :( Sniff.

I do love being with her – I don’t just use her for manual labor. ;)

I’m so proud to be a born and raised Hoosier, and this time of year I am madly in love with Indiana. It’s quite beautiful. Most think we’re just flat fields – and we do have our fair share. But there’s more than corn in Indiana -- some really gorgeous parts too. :)

My Sis, the Bub and I started our day out by driving through one of our very favorite “drive by” spots – the Meridian Kessler area of Indy. We ooohed and ahhhed over the fantastic houses, and took some hi-I’m-not-crazy-just-obsessed-with-your-house pictures along the way:

IMG_0893We had to be fast and stealth-like so the owners wouldn’t call the cops on the crazy women taking photos. :)

Some were decked out for Halloween, and the Bub would alert us by screaming “STOP!! HALLOWEEN STUFF!!” at the top of his lungs and freak us out every. single. time.:

IMG_0874Some were just plain gorgeous with some simple mums:

IMG_0875 IMG_0880

IMG_0885

Some didn’t need much of anything – they were gorgeous all on their own:

IMG_0879     IMG_0884The addresses have been blocked to protect those who live in the gorgeous houses :)…

IMG_0887

  IMG_0888  

IMG_0891

Oh my. Grey siding, white trim, red door? LURVE.

Because it was such an amazing day, we decided to head over to what has quickly become one of my favorite spots in Indianapolis – Holliday Park:

IMG_0896

It’s a fantastic park – complete with a nature center, beautiful architecture and gardens, tons of (HUGE) playgrounds and trails that take you through some gorgeous sights, down to the White River:

IMG_0944

You can’t help but completely breathe it in. It reminds me of the camping trips we took almost every single weekend throughout the summer and fall growing up. The smell of wet leaves is seriously intoxicating.

No cell phones. No emails. Someday I’m going to take a fold up chair, hike down to the river to sit and just get lost in nothing.IMG_0936

What a great reminder to just STOP MOVING. Look around. Be quiet.

IMG_0962

It was a perfect day, spent with two of my very favorite people.

It gets me so bad when I think about how much his Aunt loves him:

IMG_0942

It makes my heart melt that our son is so loved by so many other people other than us. He is surrounded. :)

I had some fun with Picnik with this one:

IMG_09652That’s a framer for sure. :)

Hope you have a HAPPY and SAFE Halloween!!

The Before and After Party will go up Monday night! 

Thursday 28 October 2010

So cheap it’s scary

IMG_1147

Can you believe Halloween is just days away? The days are going by SO FAST! I’m so excited for Monday though – November 1st is the first day I really allow myself to start thinking about Christmas. And I have a fun holiday event I’ll be announcing on Monday that you won’t want to miss! ;)

So anyway, we’ve had Halloween all over the place for a while now, but I’ve let the Bub kind of take over. I tried putting things out just so…and that lasted about ten minutes. What can I say – he’s like his Momma and is crazy about the holiday decor! I’m not going to fight it. :)

I’m so proud!! Sniff.

I’ve had the buffet in the foyer decked out for weeks now, but today the Bub and I finished it up with a little somethin’ somethin’ on the walls.

When we started working on that spot, our bright, fun lamp (consignment find) wasn’t looking so spooky. :) I wanted to Halloween-it-up a bit without having to do anything permanent.

We found some super cute downloads from the Silhouette site and used them to dress up the lamp shade a bit:

IMG_1143ACK! Are you dying? I adore these little guys.

I just gave them a very light coat of spray adhesive and stuck them on the inside of the lampshade:

IMG_1144 IMG_1145 

They were cut out of black card stock, and if you don’t have a craft cutter, you could easily download designs and cut them out. You may want to just find spiders with thicker legs if you are cutting them out by hand. :)

I love them so much! And how about snowmen for Christmas? Or snowflakes? DYING.

I finally made it back into Goodwill a couple of weeks ago, after a loooong time away. I found a $2 vase that was perfect for my Halloween “tree”:

IMG_1168

I filled it with some Dollar Tree netting, then grabbed some sticks from outside, spray painted them black and just stuck them in.

I know…I think I’m the last blogger on earth to do this. :) I wanted something with lots of height and it was perfect! I added some of my Pier 1 spiders ($1.50 for ten I think?) here and there, and some foamy bat stickers we had:

IMG_1154

The Spooky sign was from a couple of years ago and is just a $1 word mounted on Halloween paper, in an old frame:

IMG_1167

We couldn’t resist another spidey on the platter. :)

I found some sparkly spray paint on a recent trip to True Value, and knew I had to use it somehow:

Don’t you love that name – Titanium Silver? The little skull above was from Michael's and is a cardboard texture. A little Titanium and he was ready to go!

Our other skull head friend was an ugly plastic guy from the Dollar Tree, and because he was slick plastic, he got a coat of spray primer (also thanks to True Value!) and then a couple coats of the Titanium:

IMG_1170

I propped him up under a cloche and wrapped my cute beady stuff around it. Doesn’t he look so happy now? He’s positively beaming. ;)

The pumpkin was another cardboard-y thing from Michael's. I really wanted to use one of the Funkin pumpkins, but this little guy was only a couple of bucks – way cheaper! I sprayed it white and attached some strips of black gems in the grooves(a buck on clearance!):

IMG_1180

Our final project today was to add the bats flying off on the wall:IMG_1182

I cut out the ghost (by hand) out of window film I bought forever ago for the new pantry door. (You may remember it took me about six months to get that baby up.) I didn’t like it’s texture though – too bumpy for what I wanted. But perfect for a ghost in the mirror! Buwahahaha!! I love him!

We used the Silhouette to cut out the bats, but again, these are so easy to cut out on your own! I just stuck them to the wall using tape:

IMG_1163

I plan on keeping all of these – I think they’ll hold up another year easily!

We love our spooky foyer!:

IMG_1174

The best part – the whole thing was less than $10!

The cut outs are my favorite part by far…I’m so excited to do even more with them next year. ;)

Are you working on any last minute Halloween decorating or crafts? We’ve got a couple more little projects to work on over the weekend. That’s what the Bub tells me anyway. :)

For more Halloween goodness, click here for past projects!


*I was one of the bloggers selected by True Value to work on the DIY Squad. I have been compensated for my time commitment to the program as well as my writing about my experience. I have also been compensated for the materials needed for my DIY project. However, my opinions are entirely my own and I have not been paid to publish positive comments.*

Giveaway winners!

Hello there! I wanted to make sure to announce the winners from the TWO fabulous giveaways last week!

The winner of the Holiday with Matthew Mead “bookazine” is Heather at rcadenhead (at) gmail (dot) com.

Remember if you’d like to order your own copy, you can do that here.

The winner of The Rusted Chain giveaway is Amy from The Hay House

Congrats to both of you!

Send me an email at thriftydecorchick (at) gmail (dot) com and I’ll get you hooked up with your items. YAY! I’ll be back shortly with some last minute Halloween. :)

Wednesday 27 October 2010

Welcome to Crazy Town

First of all, my husband is a SAINT.

Really. On any given day when I’m working on a project, he comes home to my messes, the house torn apart and everything looking different than it did when he left in the morning.

When he takes business trips for days at a time – forget about it. I think he wonders if he’ll even come home to the same house.

He’s been dealing with my DOCD/DADD (put the “Decorating” in front of either) in a BIG way lately. When I start working on something, I usually have a vision for how I want it to look. And about 95 percent of the time, it turns out like it does in my head.

That rocks.

The other five percent, I become a waffling fool – do I like it? Yes, I do! Wait, no I don’t. I think I do. I don’t at all. What was I thinking? Well, maybe I do. I should like it. But I don’t. But from this direction it looks fantastic! I do like it! Yes! I do! Wait…

You get the picture. It’s exhausting, really.

A project in our master bedroom has turned into one of those. And it needs to be resolved PRONTO. I’m tired of dealing with it. Usually when my head turns all Cybil-like, I know to just live with it for a while and with time I figure out for sure what works and what I like.

This one I still can’t figure out. I’ll spare you all the details, but basically, our bed is about 15 feet off the floor. Or maybe about four feet. Whatever. It’s tall. And we like it.

I used to have our lamps way off to the end of our nightstands. But when laying in bed, we couldn’t reach to turn them off. Hubs actually pulled a muscle once doing it – for real. And, add to that – the nightstands were too low because the bed is so tall, and we basically couldn’t even see to read a book at night because the lamps were so far away and the light was below our heads. Make sense?

Well, just in the past week I resolved the night stand issue (more on that later), but I still can’t decide on the lighting. Originally I had an idea – I LOVE the sconces I used in the Bub’s big boy room, so why not incorporate those?:

window

I picked up a couple more at Home Depot and installed them above the bed:

And I really loved them, but didn’t love the cords or the brackets on the wall. I thought about painting the cord covers the same color as the wall, or even snaking the cord through the wall, but I knew the cord would still bug me and I didn’t want to put holes in the wall.

I’ve been wanting to take more advantage of our beautiful four poster bed, and have always dreamed of hanging fabric from somewhere, but nothing has ever looked quite right.

This was finally my chance! I got some sheers from Target and rigged them up around the lights. I ended up getting five sheers to make it really full:

I loved it at first – and then something just seemed off. It felt almost hospital-ish to me I guess. And the lampshades blend in too much –  I think if they were a bit bigger and/or a darker color, it would work better. That would be a pretty easy fix.

I absolutely LOVE the way it looks with the lights on:

Lights on is definitely more hotel-ish, not so much hospital, yes? (And I have no idea why every. single. photo. I took leans to the right.)

But here’s the dilemma – from this direction, the room looks drape heavy:

Or is it just me?

I did not clean for you. Forgive me. I want this done and DEAR LORD for all that is good, I just wanted to take the pictures and show you!

Yikes.

I need to mention at this point that hubby LOVED this look. LOVED. We both loved the lights – they are perfect (PERFECT) for checking your iphone reading before bed. That’s the thing – at night I really loved it. During the day something felt off.

So today I found a couple of lamps I loved at HomeGoods, and brought them home to try out a more traditional set up:

The iron thingamabob is not going to stay, but it needed something up there, so just ignore it.

This tells you my insanity right now –- when I first did this today I was all YES – finally! I love it! It feels right.

IMG_1129But hubby got home and really misses those lights and the curtains. He says he likes it either way, but I know he’s secretly wondering what in the heck has happened to his wife and how can he get her and his curtains back?

And just a few minutes ago, I walked in and totally missed the curtains too. And I told him I did. See? I am crazy and he still loves me. He is awesome.

Please help me.

You Squeezies are brilliant. What do your smarty pant minds think?

Things to consider – I’m thinking of a way to break up the rust colored curtains just a tad.  I want to add a touch of cream to them somehow to tie in other parts of the room. They won’t be SO solid – at least in my crazy town head.

I’m playing around with the idea of a very tailored bed skirt. If I do it, it will be the same color as the main color in the duvet cover. So that’s a lot of fabric going on with the sheers. If it’s too much, I may just get another sheet set and use the fitted sheet as a cover on the box spring (I have a white one on there now), to “hide” the box spring.

The walls are getting molding – it’s going to be a HUGE project. It will be very traditional and will break up the green walls a bit. If I keep the curtains down, I’ll most likely frame out that area above the bed with molding somehow. Not sure what I’d do just yet…

So that’s it. What do you think? Be kind. :) I like both ways, hubby says he likes both ways, but I’m running out of time because those sheers need to be returned soon if I’m not going to keep them! ;)

Oh wise and brilliant bloggy friends – which do you prefer? I know it’s up to me cause it’s my house and all that, but you guys always have great thoughts, so I’d love to hear!

I’m making a final decision tomorrow and will be done one way or the other. I mean, neither options sucks…I just want to be done! (So I can move on to thinking about Christmas decor.)

What?! Who said huh? Hmmmm?

**I’ll announce the giveaway winners tomorrow! For now I must turn my mind off. :)

Monday 25 October 2010

Our Sanford and Son deck

Well…it’s time to show you the before and after pictures of our deck clean up! As you know, I like to show you the good and the bad around here. And this one was BAD.

After reading this, you will either be highly motivated…or just highly sleepy. ;)

I showed you how we upgraded our deck just a bit last year by adding some new furniture and a faux pergola to the seating area. We LOVED it:

deck

I get a lot of questions about that pergola -- we got it from Menards. I especially love that it opens and closes – so during the day it keeps temps much cooler underneath, and at night we can open it up to see the stars.

But this summer the deck kind of went downhill…fast. It was so stinkin’ H.O.T., we were just never outside. Our backyard gets full sun and it can get unbearable, even under the pergola.

I’m not what you would call an outdoors kind of girl anyway, so when you add the potential for sweat to that…well, I’m just not going outside. :)

Anyhoo, it kind of fell apart. So now I present to you…our crapified deck…

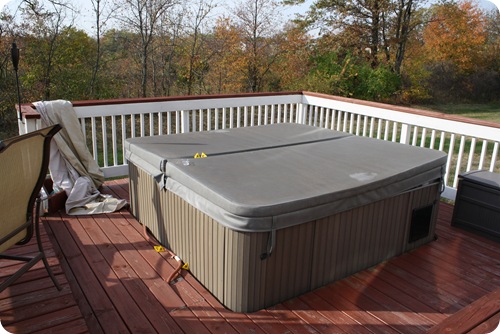
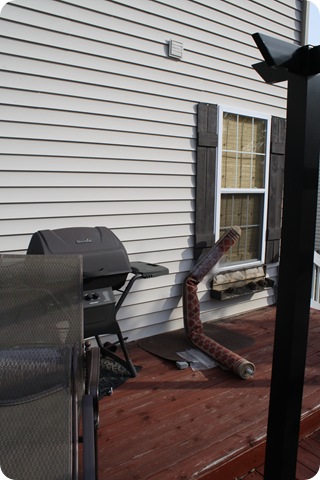
First up, our hot tub. We had this installed when we built the deck, and put it right by the back door. This is good for soaks in the winter, (proximity to the door), but not so good for as far as the beauty factor. It’s hard to make a hot tub pretty. :)

We hadn’t replaced the hot tub cover in five years, so it was disgusting. I mean…EWW. And, it was FULL of water – it took two people to lift one side of it because it was just soaked:

Let’s take a closer look, shall we?

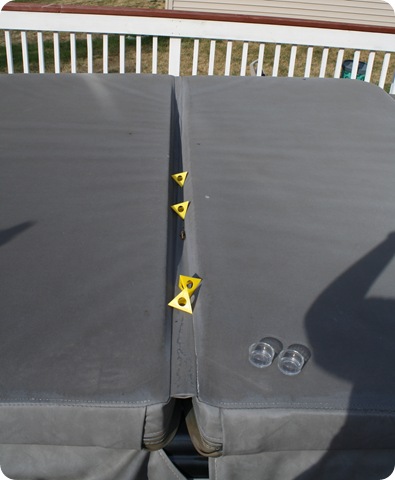
Those little yellow things are great for propping up paint projects. And they had been out there since I painted our island doors seven weeks ago. I had pretty much just given up. :)

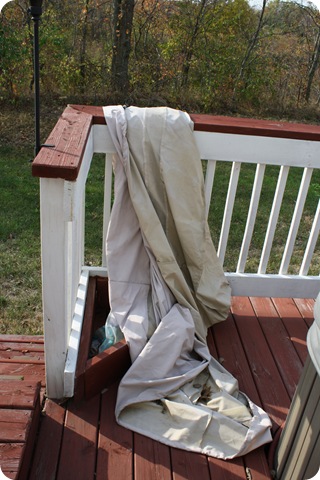
The table cover had been draped ever so beautifully over the railing since ohhhhh….May?:

And the hose had been connected to the hot tub and spread out all over since the last time we drained it in ohhhhh….March?:

IMG_0758

Told you – pure AWESOMENESS!!!

:)

Earlier in the summer, we woke to a huge mess – the middle section of our glass table was in itty bitty teeny tiny pieces all over the deck:

We had planned on replacing the whole set, but the little Dave Ramsey voice in our heads told us to wait.

So wait we did…and we had a busted table on the deck all summer. :)

I especially love the next two areas --

IMG_0761HOT. MESS.

Do you hear the Sanford and Son melody playing yet?:

No? Do ya now?:

Maybe now:

I told you our neighbors were really proud.

But it gets even better!

Remember the DIY window boxes I showed you last year?:

DIY window boxesAwww…look how cute they looked! Adorable huh?

Well. Huh. About late winter, they started looking a little rough. By spring they started splitting a bit. Just a tad.

By summer, they were full out disaster:

The shutter wasn’t lookin’ so hot either.

Because it was as hot as the surface of the sun out there all summer, I left them…hanging. :)

Oh, and all three boxes fell apart. As you can see in this picture with the “new” outdoor rug from Home Depot that we left rolled up all summer:

Neighbors = loved us.

As I mentioned a few weeks ago, I used the help of my sis to clean up some of the out of control spots in our house, and this certainly fell under the “out of control” category.

It took us a few days to finish everything up, but it wasn’t hard. We just got rid of almost everything. ;)

The first day, we took about five trips to Goodwill, loading up the table, chairs and matching lounge. The whole set was in bad shape – missing glass, paint chipping off the chairs. And I had already repainted them all once a couple of years ago.

We decided since we’ll be DEBT FREE next summer, we’ll save up for a new set. YES.

Sis and I also took a trip out to the hot tub place to get a new cover:

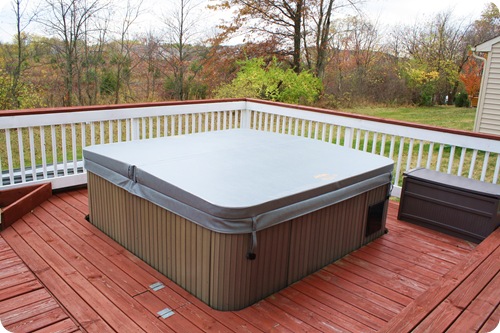
Oh my goodness – SO much better! You cannot tell how bad the old one was in the pictures, but it was so nasty!

The table cover draped over the railing was FULL of wasps nests. We used a whole can of wasp spray while out there that day because they were everywhere. Because we weren’t keeping the table anyway, the cover was gone too!

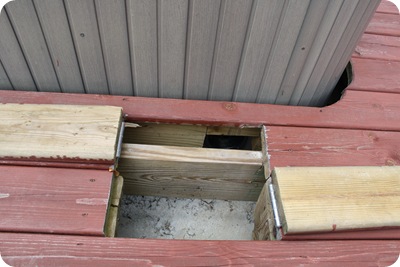
After we built the deck years ago, we realized we never created access to the hot tub drain. We had a friend come out and cut the boards so we could access it:

Because I had installed hinges that were way too small and were not meant to be outdoors, they were falling apart and it had become a major safety issue.

True Value to the rescue! I picked out some heavy duty hinges that will hold up to the elements:

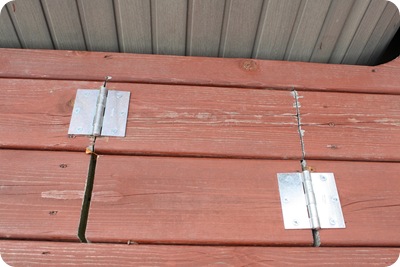
I know they’re not pretty, but they are necessary. Function over form and all that.

And oh yeah…this was my selection of hinges and screws at my True Value:

True Value

Fantastic!! I am like a kid in a candy store in this place! :)

My favorite part of the small town feel of this True Value is that you can buy individual screws – just as many as you need. They bag them up in the little paper bag – love it!! If you ever went to the hardware store with your Dad when you were little like me, this place would SO bring you back. ;)

Next, I took the beautiful window boxes down, and braced myself for the holes in the siding. UGH.

I do plan on installing new boxes at some point, but in the meantime I didn’t want the holes to be open to the weather, so I picked up some of this fun stuff as well:

I just sprayed it in the holes. A few things to watch for with this stuff – it GROWS. I know, DUH. But it grows a lot. You need very little. And it dries way darker than it looks. And finally -- it’s a one time use can, which I didn’t realize. It seals itself up pretty fast, so know exactly what you want to use it on before you start!

It did the job, but it made a mess! Some elbow grease and a razor takes it off, but I’ll finish that up in the spring:

IMG_1099I gotta have something to do out there next spring, right? ;)

I cleaned up the pergola area, tossed the dead flowers and packed away some of the items in the garage for the winter. We’ll put all of the furniture away in the next month or so.

I finally laid out the new outdoor rug – and after being rolled up in the sun for five months, it was bleached by the sun on just the edge:

I can’t let go of the Sanford and Son look completely. ;)

We had lighting installed on our deck steps years ago, and the bulbs have been burnt out for probably eight months now:

Each one only takes one bulb, so I picked up a few packs of the little halogen bulbs from True Value as well:

You want to make sure not to touch these with your fingers or hands when you install them – the oils from your hands cause them to burn out faster. I always use a paper towel or tissue to plug them in.

Now the deck is so empty…but I actually like it for now!:IMG_1109

It’s a breath of fresh air. I know by spring I’ll be itching to put a table and chairs back out, but it feels SO GOOD to have it decrapified!!

I feel like I’m ready to hibernate for the winter. ;)

There are still a few things we need to address though – one is the stain:

When you use treated wood – WAIT to stain it, for at least a few months. Our construction guy told us six months…after we stained it.

That was a great day. :)

If you do it too soon, it won’t stick. It is such a mess, and we’ve done it twice now. Next spring, we plan to use a power sprayer to really get the old stuff off, then do a couple of coats of stain again.

We still have to get the nasty old hot tub cover hauled to the dump:

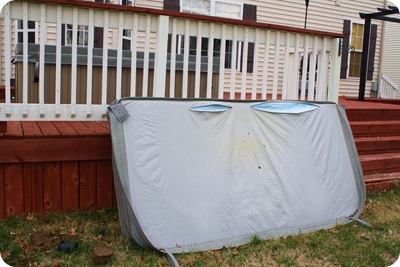
Sis and I had to cut slits to get the water out of it! It was SO CRAZY HEAVY.

And the basketball goal has been moved down to the lawn:

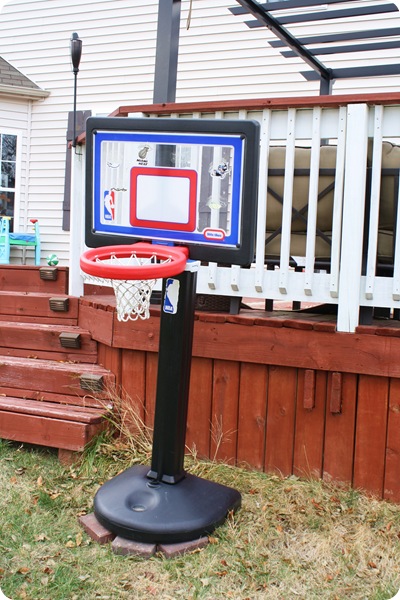
Complete with random landscaping bricks to make it steady. Steady on the dead grass. Dead grass from the blazing hot summer.

Awwww yeah….we still got some bah ba ba duh, bah ba ba ba ba ba dum in us baby! I know, you are so jealous of our awesomeness!

And now that song is in your head …buwahahaha!!

So that’s project one of the three we tackled – the garage is pretty much done and our closet was done, then it wasn’t, then it was, now it isn’t again.

I cannot keep it clean to save my life.

But I will show you! :)


*I was one of the bloggers selected by True Value to work on the DIY Squad. I have been compensated for my time commitment to the program as well as my writing about my experience. I have also been compensated for the materials needed for my DIY project. However, my opinions are entirely my own and I have not been paid to publish positive comments.*