Wednesday 30 June 2010

Month in review!

Well hello! You are all SWEETAYS for your sweet comments on my aqua and pink flag cake. I cut a piece off tonight for hubby and I must say, it’s pretty cute. Not Fourth of July cute, but CUTE.  :)

And as many of you mentioned, I’m just on the cutting edge with the hot colors of aqua and coral. I totally did it on purpose. NOT.

I have decided to start doing a review of posts at the end of each month – just in case you’re new around these parts.  :) Also, there’s usually a few things I forget to mention or that you lovelies share that I think will be helpful to others.

The beginning of the month was FUN because I took my first two trips to IKEA – both within a week! Whoohoo!!

My plan for a sofa table in our great room had fallen through and all of the sudden I had to have the Hemnes coffee table instead:

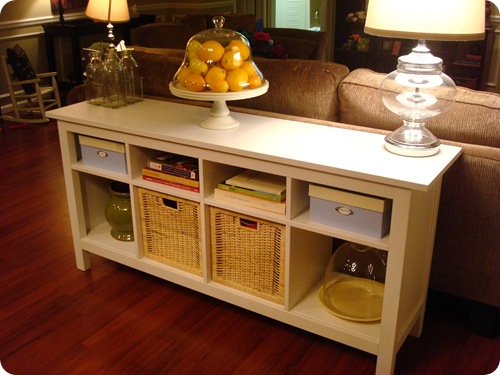
Isn’t it loverly? I LOVE YOU IKEA!! Kisses!

I posted week three of the kitchen redo, where I shared some more of my IKEA goodies and an update on the progress of our kitchen:

I swear I’ll do another update again this week – I haven’t gotten as much done lately as I had hoped, but I do have a few more projects to share! (No, it’s nowhere close to done.)  :)

The June Before and After linky party was kicked off with my first attempt at strawberry freezer jam:

And it was YUMMY!! Hmmm…now I’m hungry.

It only took three weeks, but I finished the beadboard backsplash in the kitchen:

044_thumb[1]

And I LOVE it! It is by far the biggest transformation in the room, and the cost for the beadboard was less than $50. I used the eight foot panels of primed beadboard from Home Depot, and they run about $15 a package.

Many have asked how it’s held up near the sink, and it’s GREAT! I used semi gloss paint on beadboard, and it’s sealed really well. I can wipe water right off. I was a little concerned before I installed it, but now have no worries about having the beadboard near the sink.

I shared my hatred of evil laundry, and since our dryer is on the fritz, I drooled over one of these:front loader

You all were SO helpful! The great majority of you love your front loaders, but those who don’t passed along some important info we’ll consider when buying a new washer and dryer set.

There were so many great suggestions on trying to get our current dryer to work – all we had tried, unfortunately. Bummer. One of those was to really clean out the lint trap, which is a good tip to pass along. It looks like it’s clean, but you need to use dish soap and a bristle brush to clean it out. You want water to run right through it.

Overall, nothing we tried worked, so the repair guy is coming tomorrow because the mounds of laundry are taking over!! Ahhhh!!

Every now and again I like to share what I’ve learned about blogging, and this month I talked about the importance of leaving comments:

blogger-comments-page

It really, really will bring more readers to your site! Try it out!

A couple of weekends ago, two girlfriends and I headed out to my favorite city in the world – the fabulous New York City!:

We went for the last of the NKOTB concerts (at least for a while?). I forgot to mention that the concert that weekend was the BEST one EVER. I’m not even kidding. Those Boston boys men know how to entertain!!

OH, and I forgot to tell you something wonderful!! I’ve mentioned before that there is a fabulous old Italian woman who used to sit outside our favorite restaurant in Little Italy:

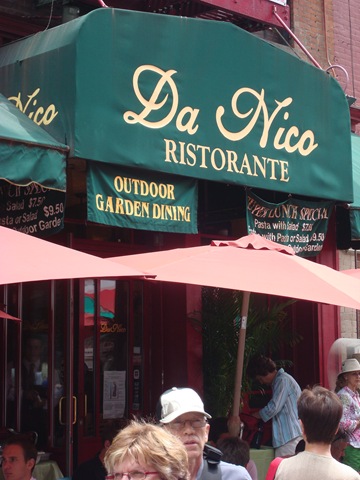
Her name was Lucy, and for years, every time we’d go, she’d be there. Our last trip she was nowhere to be found and we had assumed her time had come (she’s got to be in her 90’s!). So when I was there, I just had to ask our waiter about her.

Well he looked at me weird when I mentioned her name, and I almost teared up, thinking the worst. But he was just surprised I knew who she was – and Lucy is alive and well! :) She had just walked out right before we came in that afternoon, and he was hoping she’d return in time so I could say hello, but I never got the chance.

I was SO happy to hear that the pasta and wine (Lucy swears that’s the key to a long, healthy life) are still working!! :)

The peeps at Silhouette sent me a craft cutter to try out, and one to give away to one of you Squeezies!! For my first project, I made a stinkin’ adorable herb crate out of a thrift store find:herb crate

And later that week I fed my labeling obsession:

And it felt gooooood.  ;)

Last week I shared my cutie American flag door decor:

It was less $10 and took less than an hour to make, start to finish. I love seeing it as we drive up! :)

Many of you commented on my flower growing skills and I must say, I have little to do with the gorgeous petunias. :) I give props to Mother Nature for that one – the petunias just love the water!! (And it’s rained like the Pacific Northwest here lately!)

And finally…the beautiful pink/coral/aqua/turquoise cake, for your enjoyment:

It really is pretty darn good. :) If you want to try it out, check out the comments first. I used gel coloring, (not the icing stuff), but many of you bakers shared your favorites products that work much better – I’ll be sure to try them out next time!!

I had some fantastic giveaways this month from My Design Guide, The Pumpkin Patch, American Express and of course, Silhouette!

And I have to send out a big fat thank you to my advertisers for this month:

Bomobob’s beautiful photography:

Dimples and Dandelions boutique with adorable decor and clothing:

Photo Jewelry Making carries everything you could need:

My Design Guide can help you with design dilemmas big and small:

Well, that’s the month of June in review peeps! Thanks for coming along for the ride and welcome to the party if you’ve just joined us!  ;)

I’ll be back with the update on the kitchen…stay tuned.

Tuesday 29 June 2010

Cake FAIL

Many of you know I share the good and the bad on this little ‘ol blog. I have shared my house at it’s worst, as well as many projects I deem “science fairs” (translation = they don’t go well).

Well this one is in the science fair category for sure.

One of the many things I love about blogging is that I will now try things that I may have never attempted, because if it turns out I’ll want to share it with you all. And if it doesn’t turn out, I’ll want to share it with you all.  ;)

Let’s preface the rest of this post by saying I have baked a cake before. Many. You may not believe me after I show you this, but I cross-my-heart-swear I have.

Swear.

OK, a few weeks ago, someone on twitter sent along a picture of one of the cutest cakes I’ve ever seen – I can’t remember for the life of me where I saw it, but it was an ADORABLE Fourth of July flag cake. Not the regular sheet cake, but one that looks all boring with white icing and then PADOW!, you cut into it and there’s this gorgeous American flag cake.

Adorable.

So I’ve planned for weeks to try this out. And today I did.

And it:

a.) took FOREVER

b.) did not look like the picture

c.) like really, really did not look like the picture

d.) still tasted really good. :)

I figured I was going to have issues when I added the food coloring to the batter:

I needed some of the batter to be red for the red stripes, some white, and some blue for the blue corner of the “flag.”

Ummm…that batter up there? It’s not red. It’s pink. Maybe coral? Not red.

I added a little gel food coloring, then more, then a lot. Still coraly pink. Ohhhhkay.

I trudged on…and it was just one thing after the other. I learned some things this first time around so next year (oh yes, I will try it again!) I’ll remember them.

First tip is to just make all of the cake batter at ONE time, then segment it into five equal parts batter for all of the stripes. You can then color each batch whatever color you need, instead of making separate batches and coloring them as you go.

I did the red pink batter first and baked those cakes. Then I was going to make the white stripes, and put some of the batter aside to make the blue cake I needed. But I lost my mind for a few seconds and put the blue coloring in before I separate them – and then tried to get it out before I mixed it.

It didn’t work.

Hot mess. HOT.

I ran out of cake mix (oh yes, I used box mix!) and found a white Christmas cake mix in the pantry that didn’t expire till next February – SCORE!! I used that for the white layers I needed.

But it was still just a mess. I got whipped icing cause I LOVE WHIPPED ICING and it did not cover the cake well at all – I mean, seriously. Are you kidding me?

I just said forget it, garnished it with some stinkin’ fruit, and from the outside it looked OK:

OK, it was a hot mess. Just humor me.

But when you cut it open, the fruit on top accentuates the clash of the blue/aqua and red/coral/pink:

american flag cake

Awesome.

In the original cake I saw, there were two bottom layers of red and white, then two smaller white and red layers on top next to the blue. I didn’t have room for the top white layer. So my flag is red, white, red. Gah.

To make the flag, the bottom layers are just round cakes. The blue corner is a layer of cake, cut into a ring and placed on top of the other two. The middle two layers (what should be two layers) are the inside circle of two additional cakes. You ice between layers and then piece them together.

It’s just that easy.  :)

When hubby saw it today he was so excited I had made cake!

Then I asked, did you see it, the inside? Do you like it?

“Yeah it’s cute!” (He says just seeing the fruit and white icing. From far away.)

“See the flag inside?”

He steps closer.

“The what?”

“The FLAG.  See the three layers of pink, white, pink and the aqua? It’s an American flag!”

Crickets.

 “Ohhh, yeah. I see it! It’s cute!” (LYING. Because he loves me. And he still wants a slice of cake.)

I must say, the leaning tower of pink and aqua cake is absolutely scrumptious:

It’s not so pretty but ummm umm it’s GOOD!! :)

I have a ton of cake scraps left:

022

(Uh, is it me, or does it look NEON?)

So tonight I made some itty bitty trifles:

mini trifle

The cutey itty bitty trifle bowls courtesy of WalMart -- $2 each!

Again, I continue to accentuate the pastel tone of the cake with the fruit, but you know what? It’s GOOD! :)

So there you have it – my science fair cake fail. But what do you consider a cake fail – if it looks like a hot mess, or if it tastes like a hot mess?

Maybe it’s not a complete fail? Just a half-way one? I’m going with that.  :)

I’ll be back soon with an update on the kitchen! Kitchen projects I’m pretty good at. Fourth of July cakes – notsomuch.


P.S. The cake was from a blog with the title that was something like 18 and baking, or something like that? If you know of it, let me know! :)

**Thanks! I found it! Click here – this girl is ahhhmazing!!

P.P.S. Many are suggesting gel food coloring and that’s what I used – maybe the whole tube just isn’t enough?  ;) I have no clue – any other ideas?

This post brought to you by:

rustedcapture125

Silhouette and Crate & Barrel winners!

It’s time to announce the lucky winners of the fantastic Amex/Crate and Barrel and Silhouette craft cutter giveaways!!

First of all, the winner of the Crate and Barrel $100 gift card is:

Susie of Shafer Living!

Secondly, the winner of the Silhouette is…drum roll puuhleeze…

April of Natural Nester!


Congrats ladies!!

Remember (I believe) you can still use the code “TDC123” at check out to get the fab discounts on a Silhouette if you didn’t win!

Go here again to see the deals and more info!

I’ll be back later with what is a bit of a pink, white and aqua Fourth of July disaster. :)

Sunday 27 June 2010

Red, white and blue door decor!

Whew! I hope you had a FAB weekend! We had a great one!

Today we got to visit with someone our son has been dying to meet for a very long time:

Thomas

;) That would be Thomas the Train. I tell. you. what. He was in heaven. Can you tell?! (That’s his smile by the way.)  ;)

Then we started out the Fourth of July week by watching the local fireworks tonight – and we are POOPED. Happy. But pooped.

I got a very easy, cheap and quick Fourth of July crafty project done today that I had to share with you – I mean, when have I NOT? :)

The seed for this one was planted by the incredibly talented ladies over at How Does She – they made this adorable flag out of 2x4’s!:

Well, it got my mind a thunkin’. I wanted to make one, but I wanted to be able to hang in on our front door, so it had to be lightweight.

To make it a bit less heavy, I gathered some slats of wood for less than a buck each and a piece of plywood for about $3 from Lowe’s:

The plywood and the slats were two feet wide, but that was going to be just a leeetle large for the front door. So I decided 16 inches wide would work perfectly:

I used my very-favorite-I-luff-you-compound-miter-saw but you could easily use  a miter box and hand saw – the wood is so thin!

Since it needed to be fairly small, I did four longer rows, then four shorter rows on top:

Because I was trying to use what I had, I decided to just use the extra pieces of wood to make up the blue corner part of the flag. I figured out the measurements by just laying it all together like a puzzle:

010

Then I cut those down as well, and did a quick coat of navy blue spray paint, leftover from the Bub’s room redo.

I cut out the plywood backing with my jigsaw:

You’ll notice it doesn’t have to be perfect! :)

I glued down each piece with Liquid Nails. You could use just about anything as a backing – and any glue you have on hand to put it together. Even hot glue would work great!

I loved the one big fat star idea, so I used my Silhouette cutter to make a honkin’ star in white vinyl:

vinyl star

I attached some navy blue ribbon to the back with staples, then put little felt protectors on the back so it won’t scratch up the door.

The result? Cauuute Fourth of July decor for under $10!:

DIY flag decor

I bought eight slats of wood but only needed six – the two I have leftover would make an adorable mini version of this flag, so I think I may have to make another!

It’s a perfect fit for the front door:

Usually the extent of our Fourth decor is just our American flag (that’s usually flying anyway) and a few flags stuck in the flowers out front:

073

Can we pause to admire my goooorgeous petunias?:

069

It has rained like we’re in the freaking Amazon here this summer, so they are growing like weeds! :)

But now we have a nice pop of red white and blue to amp it up just a bit more and I luuurve it!:

079

Less than ten bucks in less than an hour – can’t beat it!!

So are you a big Fourth of July decorator? Feel free to link your projects up in the comments – I’d love to see! I have another red white and blue project I’m going to try out this week – this one could get interesting!  ;)

You still have time to win a Silhouette of your very own! If you haven’t entered yet, make sure to go here before this Tuesday!! Go! Hurry!! :)

**I’m adding this to Kate’s linky party and The CSI Project!:

Visit thecsiproject.com

Thursday 24 June 2010

Labels make me happy

Whoohoo! It’s a Silhouette giveaway frenzy folks!!

I’m back today to show you what I’ve been up to with my new favorite crafty tool:

:)

If you’ve read this blog for one hot second, you know I’m a little obsessed with labeling things. I label things that have their items in plain sight – like a basket full of cleaning supplies, I’ll label “cleaning supplies.”

OK. I know. But it’s fun!!

Well, my DYMO label maker is positively sulking in it’s drawer right now. The Silhouette may just take over around here.

It is SO easy it is to use this machine – once you get the software downloaded, it’s just a few steps and you’re cutting away! (Silhouette did NOT ask me to mention this by the way – I’m mentioning it because it really is easy.)

The first step (for text anyway) is to get your words on the document, then play around with fonts, sizes, whatever:

When I get a free 30 minutes (which will be in 15 years) I want to just play around with all of the tools to see how they work!

When you are ready to cut, it will take you through a few steps before you can start. One is to specify the medium you are cutting – the Silhouette will tell you which blade cover to use:


It takes about 10 seconds to change out the covers. Then place your paper or vinyl on the mat, click “Cut” and yer done!:

I used the vinyl they included for some of labeling projects, and some store bought vinyl I had as well. I did notice that the store bought vinyl was a bit thicker and needed the deepest blade – the Silhouette vinyl was fine with the most shallow one.

Silhouette provided transfer paper for easy vinyl application – it rocked! It’s just like the stuff that’s on top of vinyl lettering you buy. You place it on top of the vinyl and then use it to stick it to your surface:

And my labeling sickness continues.

Before, the booooring DYMO label:

(Don’t cry DYMO, I really do still love you. Kisses!)

After -- big, bold and cute vinyl!:

And remember my little chalkboard labels in our pantry? I was getting so tired of the chalk rubbing off every time I grabbed for my Pringles healthy crackers. So I made some vinyl labels instead (below the cauute labeled jars):

030

I’m in labeling heaven.  :)

This week I declared war on the paper clutter in our house (I’ll tell you more about that soon), so we now have two trash cans in the garage that needed labeling:

035

Because if we put a recycled item in the shred bin, that would just create extra work. And if a “shred” paper went in the recycle bin, then someone may see our bank statement and see how many Pringles I buy.

Can’t have that. :)

And for a fun little treat, just in case my hubby forgets what the small white pellets are in the laundry room:

vinyl lettering

He’ll be thanking me, I’m sure. :)

If you haven’t seen the Silhouette giveaway yet, click here! You have till next Tuesday to enter (and there are five ways to do so!)

Sooo…are you an obsessive labeler like me? Do you label things just to label them? Cause you KNOW it’s cute!! (Just look at that jar up there!) Or do you throw caution to the wind and just assume people will know where the trash is?  :) Do tell.


Don’t forget the awesome Crate and Barrel gift card giveaway – it ends Friday the 25th at 5 p.m. Eastern time!