Wednesday, 30 November 2011

My Go-To Christmas Decor

Well…it’s finally starting to look like CHRISTMAS up in here! I had forgotten how much I love turning off all the lights and letting just the Christmas lights twinkle. Magic. :)

As I was pulling decor out today, it occurred to me that I use the same formula every year for most of my holiday decorating. I’ve mentioned it before, but I think it’s worth repeating.

I think any home can look Christmas-tastic with three things:

1. Garland/greenery
2. Ornaments/sparkle
3. Natural elements

I used to decorate with mostly holiday-specific things – so that meant I had to take down all the current accessories and replace them with new. Let me tell you, it gets exhausting. :) All the lugging stuff down to the basement, lugging the bins up, lugging them back down, lugging the year-round accessories back UP after the holidays.

Whew. Lots of lugging.

Now I do my best to use what I already have up and Christmasfy it.

Like taking the lemons and limes out of a basket and replacing them with pinecones and ornaments:

decorating with ornaments

Score one for ornaments and natural. ;)

Remember my DIY trough thingy I made for the family room? I used all of the above to make it work for the holidays and I love how it turned out!

My favorite tool this time of year is my wire cutter:

wire cutters for garland

I cut my garland all apart using this baby. I leave some in one piece as a base, then cut individual pieces off different types of greenery to stick in here and there. It makes the end result full and more interesting. (I think.)

Then I add the lights (OK, there should be a No. 4 on that list – lights are a must for sure) and fill in any empty spots with ornaments, sparkly beady stuff and pinecones:

greenery and lights

I drilled a hole into the back of the trough so I could put the lights right through it.

NO CORDS ALLOWED.

:)

OK really, not kidding.

I added a sparkly dollar store ornament to the mirror above the TV and called it done:

LOVE. :)

Today I worked on the Goodwill shelves in our kitchen -- again, using what we already have. I stuffed some sparkly red pics in my little pitcher and then some real greenery as well:

greenery in pitcher

Is it sad that one of my very favorite parts of our new backyard is the fact that we had arborvitaes planted, so now I have access to REAL green in our house this time of year?

It makes me positively giddy. I felt like Heidi frolicking around the evergreens out there.

I used little snips of it to fill in some spots, and bigger swags that I just laid on the shelves, along with some sparkly faux greenery (that I cut off of it’s stem).

Sparkly, yes. Natural, yes. Greenery, yes. I tell ya – it works!

Add some ornaments to the mix and I really don’t think you can go wrong:

green bowl red ornaments

I LOVE the pop of green of this vintage pedestal from my late father-in-law’s house. The added bonus is I think of him every time I walk by this little vignette. :)

I wanted to keep some fun in the display, so I added a couple dollar tree trees (huh?) from a few years ago:

red and white felt trees

I love love love how this little mix turned out:

red green white christmas vignette

Best part is I already had everything. Boo.yah.

I don’t think you can get more classic than red, green and white. As much as I try to get into different colors for the season, I ALWAYS gravitate back to the classics for most of our decor.

I went the same direction with our (new) mantel – here’s a sneak peek, just cause I’m so giddy about it:

red green white mantel

This is why it takes me longer than I hope to decorate for the holidays – it’s not always just pulling an item out of the bins and setting it up. It’s taking different parts of a recipe and making something visually yummy. :)

Trying to use what I have and making it work for holiday decor is a challenge, but I eat it up. It’s WAY more fun to me – it totally gets my decorating mojo going and I love watching it all come together. It’s my thang.

By the way. This is behind the scenes of it all coming together:

I firmly believe there has to be a bit of madness in order to get to the good stuff. :)

So what are your go to’s for decorating for the season? Do we have the same list? What colors do you use in your holiday decor? I’d love to hear!

* Spell check does not recognize “Christmasfy” and “Christmas-tastic.” What is this world coming to?

** I believe I said “sparkly” 58 times.

...

Photobucket

Traditional Home

Tuesday, 29 November 2011

Nails for the DIYer

Hey hey! How are ya? I’ve FINALLY been pulling out the Christmas decor around here. Being away for Thanksgiving made me feel totally behind – especially since (like every year) I have delusions that I’ll be able to get it ALL out before December 1st.

Ummm…like every year, it’s just not happening. ;)

But I’m taking my time and thoroughly enjoying it. I’ve pulled out a few things here and there, and one of my favorites is ready to go -- the cutie Santa hats are baaaack!:

santa hat craft

With Rudolph on the TV in the background – could it be more perfect? :)

You can see how I made them here. It’s been two years and they’ve held up GREAT! The Bub was so excited to see them too – it’s like Christmas officially starts when they come out.

I also finished up the Christmas decor on the new mantel tonight and I am in luuuuurve. Can’t wait to show you it when our holiday parties start next week!:

holiday home blog parties

Thanks so much for the sweet comments on the new fireplace set up by the way. It tickles me pink that some of you felt my pain all these years and are just as excited as I am with the change. ;)

So tonight I’m sharing a little something different – you know I like to share when I find a product that I love, and I just had to do a post about this one. This will probably be the one and only fashion-related post ever at TDC, but I couldn’t resist it!

I’ve mentioned before that I never get my nails done – mostly because it’s just not worth the money for me. I get them painted (I never do the “fill” – is that what it’s called? Just painted.) and then within days (sometimes less than 24 hours), they are destroyed.

Manicures are not the DIYer’s best friend. :)

Until now. Whoo HOO!!

I read about shellac nails at Emily’s site – I think it was a few months ago. I thought they sounded awesome but since I never have mine done, I didn’t try it out till a few weeks ago.

Let. me. tell. you. This stuff is incredible!!

I got my nails done with it and then loved it so much, I did it again before our vacation last week – nine days ago. (Usually I have them done two times in a year – so that tells you how happy I am with this!)

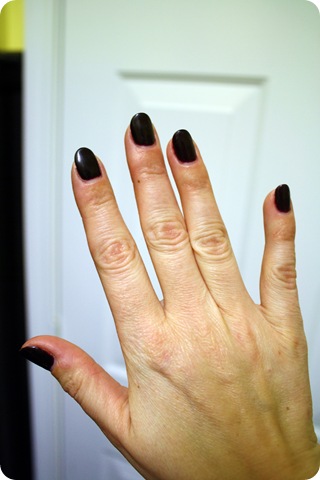
They still look like this:

shellac nails

(I’ve decided my hands just don’t photograph pretty, no matter what.)

I’m not kidding you – this stuff is impossible to mess up. CRAZY awesome. 

I’ve sawed, cleaned, bathed (duh), painted, drilled, scrubbed, scraped…ev.er.y.thing.

They still look brand new.

The only thing that has slightly done anything to them is a few wires sticking out of the garland – they got minor scratches. You honestly can’t even tell though.

As far as I can tell, the only reason to have them redone is because they grow out:

Isn’t that AWESOME?? They price isn’t bad either – just a few bucks more than a standard manicure. (At least at the salon I go to.)

I’m going to wait another week and then have it taken off for a while (they have to soak your nails and then scrape it off, so you I think you have to go into the salon to have it removed).

I’ve heard that the shellac can damage your nails, but with it on, my nails are SUPER strong, especially for the winter. Usually I have issues with them breaking easily in the cold months.

Of course I say that and tonight look what happened:

GAH!! You gotta be kidding me! Funny though – the polish is still perfect. ;) It’s not flaking off at all.

So there you go – if you love pretty nails but love power tools even more (like me) – you finally have a solution! I get to feel like a girl every once in a while now and I’m pretty stoked about that. And they are WAY more economical – at least I figure, considering the polish lasts so much longer.

Have you tried the shellac? Love it, hate it? Did it damage your nails? I’d love to hear!

...

Photobucket

Photobucket

Photobucket

Design Sponge

Sunday, 27 November 2011

A fireplace redo!

Hello my peeps!! I hope you had a LOVELY Thanksgiving week!

I’m so glad to be back, but the little blogging break was nice. :) I can’t wait to tell you what we were up to last week – but for now, I am SO psyched about the project that’s been going on around here over the past couple of weeks!

For as long as we’ve lived in this house, I’ve had a thorn in my side…that I may have mentioned one or 437 times.

Our family room set up was part of the issue for a very long time – but I addressed that earlier this year with our new sofa and moving the TV. LOVE it still – probably the best changes I’ve made to our home.

But there was that one thing. That corner thing. The one that drove me batty:

I curse the day I chose that corner fireplace! Shakes fists in air!!

I know it doesn’t look that evil. But it was.

Ahhh…all those years ago, I thought oh yes – let’s do a corner fireplace and be all cool and different and uh...ANNOYING.

I’ve addressed it numerous times – first by adding molding to the top. It started out looking like this:

And then I changed it up a bit later by adding a mirror over the mantel. It was great because it gave it the “feel” of a wall.

But there were still so many things that drove me nuts. I added crown to the room this year, and I had to end it by the molding over the fireplace. I hate the weird stop – but I’ve not found a better way to do it. And I realized a few months ago that part of the reason the fireplace looked weird to me was because it was so top heavy – big on top, little on bottom.

And the corner mantel was really a pain in my patoot to decorate. And I’m all about the decorate:

problems with corner fireplace

And even though the top was large and in charge, the whole thing felt too small for this space.

I thought about taking in the chunky molding on top, to make it less top heavy – but then I was going to have to redo that and the crown. Nah thanks.

Then I thought about building a wall above the mantel to close it off (many of you have suggested that). But it would have just made the mantel even smaller.

Then I had THE idea…and it was right in front of my face every night for the past eight years.

Why not try to make a full wall like the one in our bedroom:

Nah DUH.

I’m quick.

But then there was another issue – the firebox couldn’t be moved out to meet up with a new wall. I didn’t know how to make it work (I thought it all had to be flush.)

But then, one glorious day, I walked through a model home (one of my favorite things to do!), and found IT!!

It was a corner fireplace, with a wall. But the firebox was inset quite a bit:

It was a good five inches or so. And I knew I could do the same with our fireplace! (With some help.)

Cue the angels singing. (I almost wrote “angels signing” – which would be OK too.)

I called the handymen who did a ton of the work around here when we had the fridge/floor fiasco. I explained what I wanted to do, showed them pics, then showed them our upstairs fireplace and THEY SAID EASY PEASY SQUEEZY!!

Yesssssssssssssssssss.

So a couple weeks ago we started with this:

Vince (Handyman #1) took the mantel off (it was way easier than I thought it would be) and the trim around the front of the fireplace, then started building a wall:

And what a glorious wall it was. I’ve never been so happy.

(They even added studs between the studs right where I would hang the mirror – no anchors needed!)

Then they drywalled and sanded like mad (which resulted in more dust than we had when the floors were sanded – no joke):

Then they started building the mantel. A REAL mantel people!

HAPPY HAPPY JOY JOY!

They couldn’t go real beefy with the surround because I wanted a DEEP mantel and enough space around the fire box to install tile. So in order to make that work, the sides were a bit thinner, but the molding and mantel were chunkaaaay.

To save on costs I finished the redo from there. You’d think it would be quick, but nah. You know me. :)

I found a beautiful mosaic tile at Lowe’s (I found it months ago and knew I’d use it if this project ever happened). The guys brought me their tile saw to use and it ROCKED! It was so easy to use!

I made the cuts for the side pieces:

And used mastic to apply them around the fireplace:

tile mastic No mixing required – it was SO easy to use!

I just buttered the wall:

tiling a fireplace surround

There was a bit of a gap between the firebox and the drywall around it when they pulled off the trim. You can see here that they ended up installing some luan that covers that gap and gave me a good surface for the tile.

Then I buttered the back of the tile:

mastic on tile

And stuck it on. It does not take much – I used too much at times and it came out between the tiles. Not hard to clean up, and you just learn as you go. I didn’t have to grout because the tiles were so close – whew!

I LOVE how it turned out!

mosiac tile around fireplace

We went away on vacation last week, and I was chomping at the bit to get this finished up! I worked most of today painting. And painting…

Forgive me for these pics – it was pitch black at 5 p.m. and I was busting booty to get this finished today…but the pictures didn’t start till about 7. :)

After three coats on the wall, four coats on the mantel and surround (it still needs at least one more), reinstalling all of the wainscoting next to the fireplace and then some quarter round at the bottom, I was DONE:

What you don’t see here is the nice little large spot where I put painter’s tape on the wall too soon and had a nice loooong patch where the drywall was exposed. And then had to patch and paint all over again. Hence the 7 p.m. pics. ;)

But I’m pretty much done – finally! I put accessories up there for it’s first photo shoot and I was SO excited at how easy it was to make it look decent and how BIG the mantel is and HOW MUCH I LOVE IT!!!:

:)

The guys used one (really, really thick) piece of molding to beef up the mantel and I love it – its exactly what I was hoping for!:

I still have some touching up and caulking to do, but I was tired of messing with it today. :)

We all stood in front of it last week commenting on how much we liked that it’s inset – it makes it look like it’s been their forever, like something you’d see in an old house:

The one thing Mike (handyguy #2) mentioned later was that he wished he had thought about adding lights underneath that I could dim – what a great idea! Wish I had thought of that. ;)

But honestly I don’t think I could be happier!

I was willing to give up some square footage in the family room – I actually wanted to go out a little further. But the guys didn’t want to take it too far out and now I know that was a good call. Overall the wall comes out about a foot more than it did before.

We don’t even notice it in the least though – it feel like it “fits” in the room SO much better! It really feels like it was always like this!

I have all kinds of ideas running through my head for the wall above the mantel – some kind of molding treatment. But I’m really digging the simple, clean look right now – I don’t know if I’ll even add anything:

It’s so surprising to look at the before and after – the before looks SO busy and overwhelming to me. And now it’s bigger and even more of a statement but it feels simpler and easier:

Oh happy day. :)

So there you go…what I’ve been up to the past couple of weeks. Can’t WAIT to decorate this for Christmas! The guys even moved the outlet (behind the candlesticks) so I can still have my twinkling lights up there.

It took a little help from the professionals (building a wall isn’t in my repertoire, but I’m working on it!), but I was able to fix the thorn in my side. I am so thrilled! Do you have something about your house that drives you crazy? Have you thought of a million and one ways to fix it? ;) Actually done it?


**You can see how to make that mossy letter here! And no, it’s not upside down. I promise. :)

...

Photobucket

Decorpad